Sunday, November 3, 2013

Creating Garden Art from Family Treasures

Do you have a stash of glassware floating around that you don't have a use for but hate to get rid of?  One of my clients created beautiful art for her garden using a variety of glass items she had inherited from her family. 


As you wander the paths through her lovely garden, you just happen upon the glass sculptures. Hesitant, at first to alter these items her Mother had given her, she decided to take the plunge when she considered they had been boxed up in her basement for years.  Now, she gets joy from seeing them in her garden daily.  (I think she has a magical basement, it is a never ending source of treasures!)  


To assemble the heirloom garden sculptures she used a tube of E-6000 -- available at craft and home improvement stores or on Amazon.  Using an upside down vase or bottle as the base makes it easy to simply slide the sculpture over the top of a stake anywhere in your garden and to empty any rain water that may accumulate 


Follow directions carefully as the glue needs to cure for ten minutes and is hard to re-position when dry.


I missed this beauty on my first trip through! 


The bird and flower shapes are such a natural complement to the plants.
Sunlight playing on the glass adds a bit of sparkle to the garden.


If you don't have a magical basement full of treasures, check out your local thrift stores
 and neighborhood yard sales.


Bonus Feature:  The galvanized bucket she bought on my opening day at Factory Antiques
 holds a Mum in her deck herb garden.  


The child's rake, pumpkins, and Pottery Barn owls complete the Fall vignette.  
Watch for a more detailed post on her garden next Spring.


Happy gardening!

Wendy

Tuesday, October 29, 2013

Holidays: Halloween Mantle

With Halloween only a few days away, I wanted to share
 this amazing Halloween mantle by my intern's daughter.


A quick trip to Hobby Lobby provided the necessary Halloween accessories 
to transform her mantle.  I love the way the black bird decals add a sense of 
movement while the banner grounds the display.  The traditional Halloween 
orange has been updated with a deep cinnabar for the candles.


Note the use of odd numbers:  Seven candles, three pitchers, one skull.


There is an art to getting a 99 cent package of spider web to look this good.  
(A skill I have not mastered).

Happy Halloween!

Wendy

Tuesday, October 1, 2013

PINTEREST PROJECTS: Mason Jar Shower

I am the first to admit I am a Pinterest addict!  With 162 boards and over 13,000 pins, there is no denying it.  My boards include recipes, party ideas, yard and garden, blogging tips, inspiration for clients, and articles I want to share with HHM.  My memory has never been great and it continues to spiral downward with each passing year.  Pinterest keeps all the great ideas I see on the web in one place for me. 
 
So, when I started planning a wedding shower for a dear friend and his fiancée, Pinterest is where I began.  My Mason Jar Board had many ideas that I have been wanting to try so that was my jumping off  point.  I did a quick search of Mason jar invitations and fell in love with this one.
 
 
A quick change of wording, a click of a button and my invitation digital file arrived in less than 24 hours.  Thanks Sprinkles of Sugar Etsy shop!  Not only did I have an inspiration for my decorations, I now had the color scheme:  coral, gray and white.  Be warned if you choose this color scheme - coral paper goods and fabrics are few and far between in local retail stores.
 
After browsing through my Mason Jar Board, I decided to bake apple crisp in mason jars.  Although I used my Mom's recipe, I checked several different pins for converting the cooking time for the small jars.  (Approximately 30 minutes, then broil for 2 or 3 minutes to brown topping).
 
 
Using  four ounce jelly jars, I found it took about one chopped apple per jar.  The apples need to be mounded high as the they will cook down.  Growing up in Michigan, my Mom always used locally grown McIntosh Apples and they are still my favorite.
 
 
After a little experimentation, I found packing the crumb topping on over a bowl  prevented it from spilling everywhere!
 
 
Six pounds of apples made about 24 individual jars of apple crisp.  That's a lot of peeling.
 
 
The finished product was worth it!  Notice the great tablecloth my trusty intern found on sale at Williams Sonoma.  The colors were perfect! 


This pin from Décor 8 was the inspiration for the floral arrangements.  (I repined this from my future daughter in law's board.  Thanks, Ashley!  Yes, we will have both a daughter and daughter-in-law named Ashley)
 
 
I substituted canning jars for the bottles.  The scrapbook paper on sale at Michael's and the striped string came from Hobby Lobby.  And of course, Trader Joe's is always great for fresh flowers.
 
 The extra paper made cute decorations for the mason jar drink glasses.  The striped straws are from Michaels.  HHM made a great apple cider drink with vodka and sour apple schnapps!


We feasted on mini chicken waffles in the chafing dish (inspired by this pin), almond stuffed dates wrapped in bacon, homemade caramel apple dip, mini corn muffins, home made cookies and goat cheese & fig preserve bruschetta!  Thanks to all my PB friends for their yummy food.  The groom to be added some caramel sauce to his apple crisp, delicious!

 
The one disappointment of the night was the home made pimento cheese served on crackers.  My plan was to serve all easy to pick up finger food.  However, the crackers quickly became soggy! Live and learn.

 
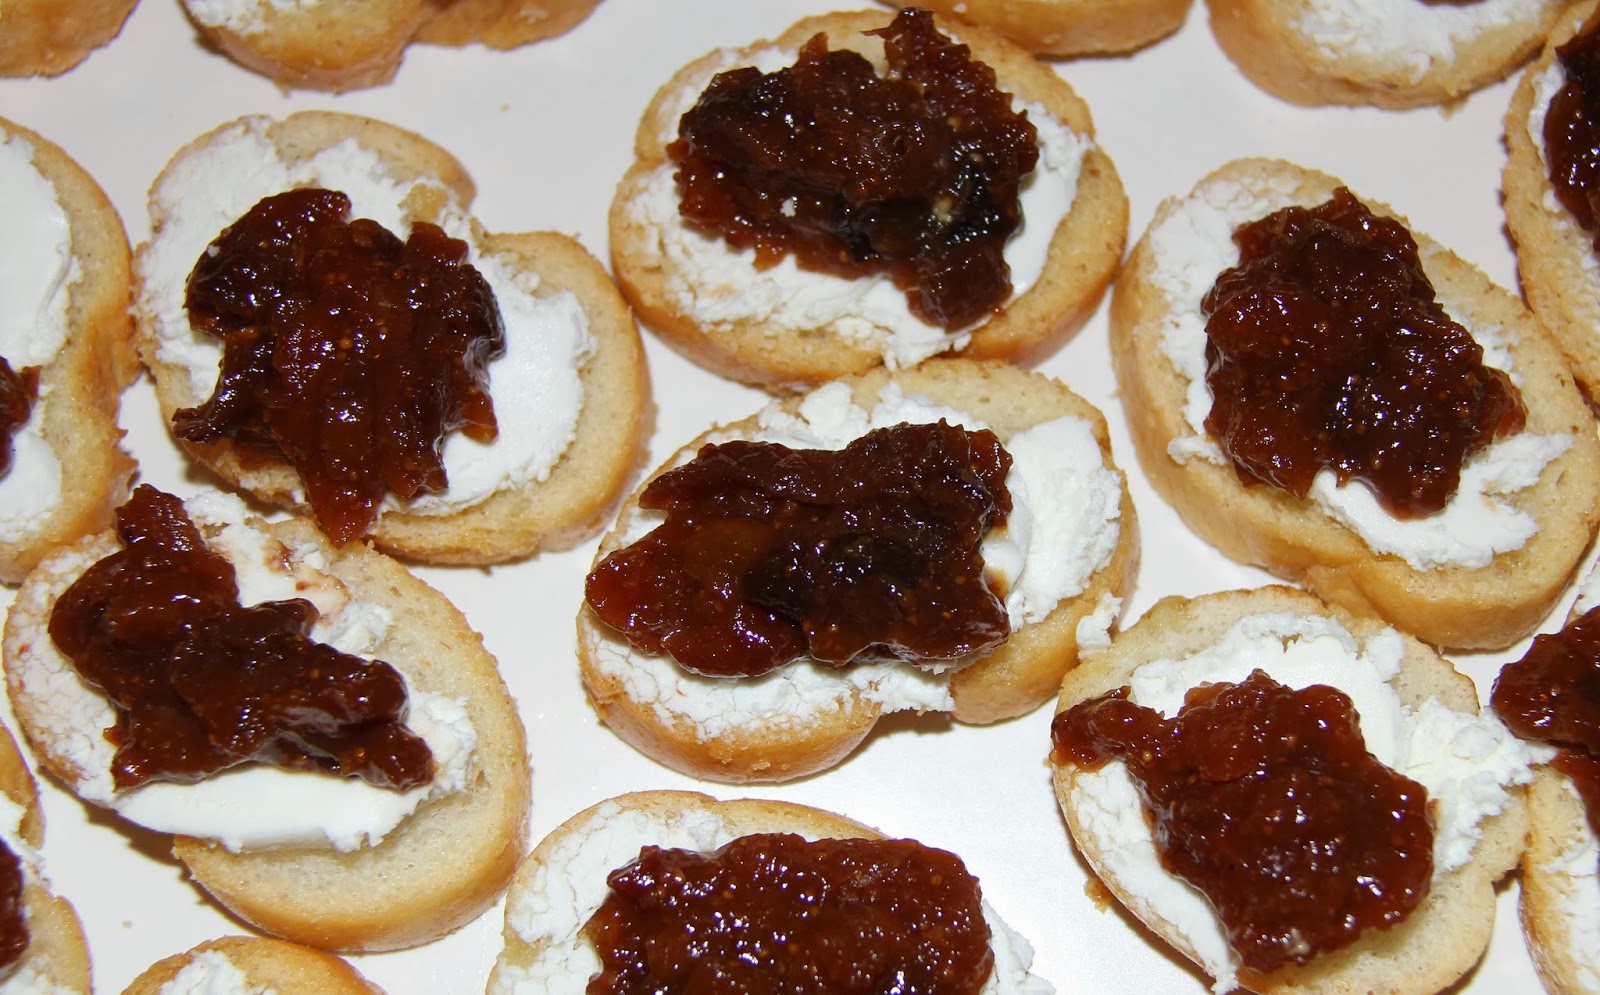
Can't go wrong with goat cheese and figs!
 
 
Bacon wrapped, almond stuffed dates:  not pretty, but oh so delicious.
 

Self serve beverage service 


This cute ribbon banner, again found on pinterest, was the inspiration for my fireplace fabric banner.
 
 
Entertaining is such a motivator.  The day before the party I exchanged my summer mantle artwork and display.  I was quite pleased with this arrangement composed of items I already owned - - pays to be a pack rat antique dealer.  

 
The white eyelet was a remnant from sweet Emily's nursery.  I purchased five fat quarters - - two gray and three coral.  Again, the selection of coral fabrics was limited but I was very happy with the end product.
 
Well, that's 5 pins out of over 13,000 I used for the shower!  Look for a post next week on another pinterest inspired project.
 
Wendy


Thursday, September 26, 2013

Factory Antiques: Using Vintage Peices for Organization

 
HHM and I have been out and about searching for great new treasures to add to the booth.  One of my favorite items is this fabulous wooden ammo box..  Produced in May of 1953 by the Riverside Box Company in Bloomington, IL, it was used to hold fragmentation hand grenades.
 
 
Need to get more organized this fall?  This box has so many uses:  mail, school papers, DVDs, towels, books, the possibilities are endless.
 
 
Pottery Barn uses a similar crate as a portable bar on the bookshelves shown here.
 
 
Here's a closer look.
 
 
These vintage metal file boxes are a fun way to store all those papers cluttering up your desk:  warranties and owner's manuals, bills, recipes, magazine clippings.  Stash the file box in your bookshelves, and that ugly paper work is camouflaged.
 
Green Park Ave File Folder
 
Add some pretty file folders and keeping organized becomes more fun.
 

What would you store in this chippy red pie safe?
 
Wendy


Wednesday, September 18, 2013

Furniture Fix Ups: Not your Mama's Chair

Over the past few months, I have been helping a newlywed couple merge their homes.  His taste runs toward clean line classics (think Crate & Barrel) while she is much more eclectic (think Anthropologie).  He likes neutrals. She loves color. They sold her condo and moved into his house, so one of the main objectives for the project was to infuse some of her style into the existing space.
 
 
The home office is the first thing you see when you enter through the front door.  They both need a place to work at home and wanted to add a comfortable seating area. I know, right, where?  After discussing how the space functions for them, it was decided that the bookshelves could be moved to another room.    

 
The furniture was then changed to a functional L-shape to free up space in the corner for a chair.  Also, now the desks are not the first thing you see upon entering the home.  We all know it is impossible to keep your desktop neat all of the time (ever?) -- plus, now they can both see out the windows while working. 
 
After further discussion, my client pulled out a chair that her Aunt and Mother had purchased at an estate sale years ago, along with some fabric she had purchased at Lewis and Sheron.  She suggested maybe we could use it for an accent pillow.
 
 
The lines were beautiful but the fabric was worn.


There was only about a yard of the fabric so I suggested we mix it up a little.
My client loved the idea and the search for fabric was on!  (Sorry, I did not get a picture of the original fabric).
 
 
I found this beautiful Belgian Lace fabric (on sale half price!) at Lewis and Sheron - perfect for the back of the chair and all of the welting! The fabric for the seat cushion was a little more elusive.  Nothing jumped out as the perfect fabric.  Now, although the inspiration fabric has purple in it (and we all know I love purple!), my client told me at our first consultation that she didn't really care for purple.  Many of the fabrics I found in the right colorway seemed too traditional -- almost grandmotherly.  (Not trashing grandmothers here, being one myself.)   I picked up a swatch of a purple fabric with red dots on a whim. Well, as you can see, it was the one my client chose!

 
Button detailing
 
 
Welting close up
 
 
View of all three fabrics!

 
As much as I like to make my clients happy, part of me hoped she wouldn't like it so I could purchase it from her for my living room (where it looked amazing!).  I am glad to report, she loves it.  I haven't heard how her Hubby (or her Mom) feels about it.  Here is a view of the chair in the client's office.  (We are still waiting for the last two picture rails from West Elm that were ordered in March!)  Once we add a small side table along with a floor lamp, the corner will be complete.
 
 
The total price came in at less than $500!  What does your Mom have stashed away in her basement?
 
Wendy
 
I’m linking up to:
 

Sunday, August 18, 2013

All in the Family: Grandma's Kitchen Table Repurposed as a Coffee Table

Let's just say, the acorn doesn't fall far from the tree.  Although my children, along with my nieces and nephews have mocked my sisters and my creative endeavors throughout their childhoods, they are now starting to pursue their own projects.  My sister texted me pictures of the coffee table my nephew built using his grandmother's old kitchen table.
The finished product looks great in his new house. (Jared, you can check out how to style a coffee table on my previous blog post here.  I am sure you can extrapolate the principles to a rectangular coffee table).
I don't have a lot of details on his construction process but am guessing that the top with the legs removed, fits down in the box he constructed.  Good job using towels to protect the floor!  Of course it couldn't be constructed in the garage due to the newly installed gym.
Truly a Renaissance Man!
 
 Here you can see the drill holes left by my Mother as she made sandals out of oil cloth for Vacation Bible School.  Whoops!  Don't you love a piece of furniture with history?  Now you see where this craftiness talent comes from.  It is in the genes!
Being a true member of the Britt Clan, he saved the legs for future use.  I found these ideas for him by googling repurposed table legs:

Spindle Christmas Tree?
And of course, if you have a few fan blades laying around you could make your Mom some yard art!  She would, however, want them in a brighter color.
 
Any other ideas for repurposing the table legs?
 
Wendy